venerdì 28 dicembre 2012

Regalo di Natale

Buongiorno a tutte Voi...
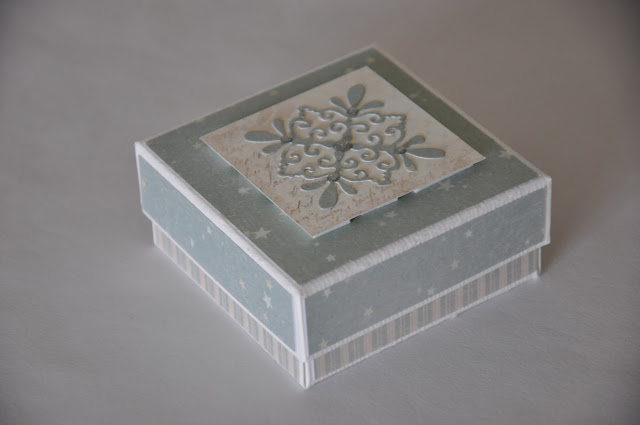
Oggi Vi mostro un lavoro che mi e' stato commissionato in occasione del Natale. Si tratta di due scatole che dovevano contenere un segna libro bellissimo. In una, in particolare, e' stata richiesta la personalizzazione con il nome. Le carte usate sono, come voi ormai sapete, Pion Design e in particolare la collezione e' " For Mother". Queste carte le potete trovare QUI.


Hi ..
Today I show you a job commissioned for Christmas. These are two boxes that had to contain a beautiful book marks. In one, in particular, there is the personalization with the name. Cards are Pion Design and the collection is ''For Mother". You can find these papers
HERE .


Ogni collezione Pion Design contiene sempre una pagina di complementi. Come qui vedere ho usato i bordi sui lati del coperchio delle scatole.


Each Pion Design collections always contains a page of accessories. As you can see here, I used the edges on the sides of box lid.


Usando due angoli diversi dello stesso foglio e unendo le due scatole si puo' avere questo effetto.
 

Using two different angles on the same sheet and joining the two boxes you can have this effect.


Nelle parti interne delle scatole ho creato un fondo per valorizzare maggiormente l'oggetto.
 
 
In the box I created a fund to enhance the value of this object.


Vi saluto e Vi abbraccio...a presto...
Ada.
 
Hugs Ada.


...


giovedì 20 dicembre 2012

Madonna col Bambino

Buona sera a tutte Voi...
 
Questa sera pubblico una card fatta usando un' immagine ritagliata da un foglio da decoupage, immagine che mi piace moltissimo. Con questo biglietto colgo l'occasione per augurarvi un felice Natale e Vi auguro anche di ricevere dall'anno nuovo tutto quello che piu' desiderate...


Hi...

Tonight I public a card made ​​using a picture cut from a sheet of decoupage, image that I love a lot. I take this opportunity to wish you a Merry Christmas and I hope you will also receive for the new year what you want ...


A presto...Ada
 
soon...Ada


...

venerdì 14 dicembre 2012

Chiudi Pacco

Buona sera a tutte Voi...
Oggi Vi mostro alcuni lavori che avevo presentato, alla bancarella della sagra, come chiudi pacco, acquistati poi come ornamenti natalizi. La prima serie da quattro e' realizzata con carte polacche, mentre le altre con le mie amate carte Pion Design che fanno parte della collezione "Silent Night".
Di seguito le foto che purtroppo non rendono molto la realta'.


Good evening ..
Today I show you some works that I presented at the stand of the festival, as close pack, then bought as Christmas ornaments. The first set of four made with cards in Poland, while the other with my beloved Pion Design papers that are part of the collection "Silent Night."
The following photos unfortunately does not make much the reality '.


Infine pubblico una foto alla quale tengo moltissimo perche' rappresenta la bellissima bancarella di dolci che noi rappresentanti di classe della scuola elementare abbiamo organizzato con lo scopo di raccogliere fondi per la scuola. Il nostro impegno ci ha pienamente ripagate a fine giornata quando nella cassa c'era una cospicua somma che sarebbe stata interamente investita per la scuola e quindi per i nostri bambini. Un GRAZIE a tutti coloro che hanno contribuito, un GRAZIE a tutti coloro che hanno acquistato i dolci e...
un GRAZIE a Daniele, Maria, Patrizia, Aurelia, Caterina, Rita e Ada.


Un saluto affettuoso a tutte Voi che mi seguite da vicino, da lontano e mi lasciate sempre bellissimi commenti...
un abbraccio Ada.


Affectionate greetings to you all that you follow me and I always leave wonderful comments in my blog ... 
hugs Ada.
...

lunedì 10 dicembre 2012

Ornamento

Buongiorno a tutte Voi...
Oggi Vi mostro un lavoretto fatto seguento un tutorial che ho trovato su you tube e che potete vedere QUI
Si tratta di un ornamento natalizio che puo' sembrare difficile ma in realta' e' molto semplice da realizzare.
Questa e' la mia versione...


Hi...
 Today I'll show you a little work done whaching a tutorial on youtube. You can see this video HERE.
It's a very simple Christmas ornament to do.
This is my version ...


Volevo ringraziarvi per i bellissimi commenti che lasciate nel mio blog...
un abbraccio Ada.
 
 
I wanted to thank you for wonderful comments you leave on my blog ...
hugs Ada.


...

mercoledì 5 dicembre 2012

Exploding Box

Buona Sera a tutte Voi...
Oggi Vi mostro due exploding box che mi sono stati commissionati in occasione del Natale. Come sapete li amo molto e adoro realizzarli.
Di seguito le immagini...


Vi saluto e Vi auguro una buona serata...

a presto Ada

soon  Ada


...

domenica 18 novembre 2012

Laurea

Buon Giorno a tutte Noi...
 
 Oggi Vi mostro il primo lavoro che presentero' alla bancarella della Sagra del mio paese domenica prossima.
Sono scatolini a forma di fragola contenenti confetti rossi. Non sapevo come presentarli poi ho pensato ad un cestino. Il cartoncino rosso perlato per realizzare queste fragole lo potete trovare QUI
Ecco il risultato...


Hi ...

Today I show you the first job that I will present at the stand of the festival in my country next Sunday.
They are little strawberry box with red "confetti". I did not know how to present them so I thought of a basketHERE you can find red pearl cardstock to make strawberry.

Here is the result ...


Buona Domenica a tutte Voi e a presto...

Ada


...

venerdì 9 novembre 2012

Mini Album Luca

Buon Giorno a tutte Noi...
Oggi pubblico la seconda parte della Cresima di Luca. Nel post precedente Vi avevo mostrato i ringraziamenti, qui il Mini Album. Per realizzarlo mi sono ispirata ad un lavoro della bravissima Monia, lavoro che potete trovare QUI.
Un Album personalizzato con il nome e inserito come sempre nella sua scatola.

Hi...
Today I am publishing the second part of Luca Confirmation. In the previous post I showed you the thanks, here Mini Album. To realize I was inspired by a work of talented Monia, work that you can find HERE .
An Album personalized with the name and inserted as always in his box


Qui in particolare la decorazione sulla copertina che e' il risultato di una serie di prove. Il fiore e' timbrato e piegato per dare effetto 3D mentre i pallini rossi sui soffioni sono fatti con un liquido perlato rosso.

Here in particular the decoration on the cover is the result of a series of tests. The flower is stamped and bent to give 3D effect while the red dots on the dandelions are made with a red liquid pearl.


All'interno ha una facciata timbrata e glitterata...mentre le altre tre facciate contengono le foto (formato 15 per 20) con i momenti principali della cerimonia.

The interior has a façade stamped and glittered ... while the other three sides contain photos (size 15 to 20) with the main moments of the ceremony.


Spero Vi piaccia...
Un bacio e un buon fine settimana.
Ada

I hope you like it ...
 Kisses and have a good weekend.
Ada


...

venerdì 2 novembre 2012

Cresima di Luca

Buongiorno a tutte Noi...
Oggi Vi mostro la prima parte di un lavoro che Rosa mi aveva ordinato per la Cresima del figlio Luca. Ho realizzato ben 25 ringraziamenti in bianco e azzurro con la foto ricordo...
La struttura e' quella a Tag con molteplici lavorazioni della carta e stamping compreso.

Hi ...
Today I show you the first part of a work that Rosa had told me for confirmation of his son Luca. I made a 25 thanks in white and blue with a souvenir photo ...
It's a tag structure with multiple processes including stamping and paper.


Qui nell'insieme
Here the whole


Nella parte anteriore ho creato una finestra giocando con fustelle spellbinders che hanno delle potenzialita' incredibili e possono essere usate in molteplici modi.
Al centro embossing oro del bellissimo e raffinatissimo timbro cresima di IMPRONTE D'AUTORE che potete trovare QUI.

In the front I have created a window playing with Spellbinders dies that have increbible potential  and can be used in multiple ways.
In the midle there is a beautiful and refined gold embossing stamp confirmation of
 IMPRONTE D'AUTORE which you can find HERE.


 Qui la parte anteriore della tag.

Here the front of the tag.


E qui il retro con tasca foto porta tag ringraziamento.

And here is the back with photo and tag.


Una aveva la sua scatola con un bottone bellissimo sulla chiusura del fiocco.

A tag had his box with a beautiful button closure on the bow.


Le altre tutte riunite in un'unica scatola.

The others all together in one box.


Ringrazio tutte Voi per i bellissimi commenti che lasciate nel mio blog.
Baci Ada.

I thank you all for wonderful comments you leave on my blog.
kisses Ada


...

domenica 21 ottobre 2012

Glitterare a mano

Ciao a tutte voi...
Questa sera pubblico il tutorial per glitterare a mano biglietti, scatole e tutto cio' a cui si vuole dare l'effetto glitter a secco senza uso di colle liquide.
Procuratevi del glitter, dello scotch bioadesivo alto 5 mm e una forbicina.

Hi ...
This evening I show you a tutorial to glitter cards, boxes without the use of liquid glue.
You need glitter, scotch bioadhesive 5 mm high and a pair of scissors.


Qui di seguito vi mostro come lavorare il coperchio di una scatola o di un exploding box. Ho preparato il taglio di un quadrato e con il bulino ho fatto le pieghe.

Below I show you how to work the lid of a box. I made a square cut and with the burin I made the folds.


Ho delimitato con lo scotch biodesivo il quadrato e i rettangoli stando il piu' possibile vicino ai segni del bulino.

I have stuck with the bioadhesive the square and rectangles standing as much as possible near to the signs of the burin.


Nella parte interna lo scotch e' doppio perche' quando monterete il coperchio ogni lato avra' lo stesso bordo di glitter...

Inside the bioadhesive is double because when you will mount the cover on each side will have the same edge of glitter ...


Togliete lo scotch...

Remove the bioadhesive


E cospargete con il glitter...

And sprinkle with glitter ...


Fate pressione con il dito su tutti i lati...

Apply pressure with the finger on all sides ...


e togliete gli eccessi...

and remove excess ...


Ecco il risultato finale.

Here is the final result.


Poi tagliate il quadrato e i rettangoli di carta scrap con misure che vi permettano di lasciare naturalmente il bordo lavorato con glitter. UN ACCORGIMENTO quadrato e rettangoli devono avere una misura leggermente un po' piu' grande rispetto al bordo glitter interno onde evitare piccoli spazi vuoti.
Ad esempio nell'Exploding box del post precedente a questo, ho lavorato anche le pareti esterne e interne del cubo. Questa lavorazione richiede tempo e pazienza dando pero' ai vostri lavori un tocco in piu'.

Se non fossi stata chiara scivetemi che saro' felice di rispondervi.

E infine pubblico la foto di una macchina che cercavo da tempo per cucire la carta, macchina che mio zio Gino ha trovato in un mercatino di antiquariato.  Funziona a navetta e lavora benissimo. Quando l'ho vista mi e' subito piaciuta. Non siamo sicuri ma molto probabilmente risale alla meta' dell'800 ed e' una "Original Brunonia"

Then cut the squares and rectangles of paper scraps with measures that will allow you to leave the board of course worked with glitter. A trick square and rectangles must have a slightly a bit more larger than the inner edge glitter to avoid gaps.
For example in 'Exploding box of the previous post to this, I worked the outer and inner walls of the box. This process takes time and patience but giving 'to your work a little extra'.


If I was not clear, please write to me I'll be happy to answer you.

And finally I public a picture of a sewing machine that I was looking for a time to sew the paper, machine that my uncle Gino found in an antiques market. When I saw her I 'immediately liked. We're not sure but most likely dates from the middle of XIX century and is an "Original Brunonia"


Spero di esservi stata utile...
un abbraccio Ada

I hope to be helpful ...
hugs Ada


...